****Update - 10th February 2010****
This worked well in Leopard, but I haven't got it to work since upgrading to Snow Leopard. Does anyone have a fix?
One of the things which has always bugged me about my Mac is the lack of a shortcut key to turn the Airport WiFi on and off. At home I connect using WiFi and in the office I plug into a wired ethernet connection, so I wanted to be able to turn the Airport on or off with a shortcut key instead of having to use my fat fingers and the mouse to click on the fiddly little Airport symbol in the menu bar. Unfortunately, Apple didn't build an Airport shortcut key into OS X. I'd been looking for a solution to this problem for ages, and now I've finally got it worked out.
What You'll Need
- OnMyCommand (OMC) - a great tool which allows you to run Unix commands (which you normally type in terminal on your Mac) with the click of a mouse or using a shortcut key. You'll be using OMC's OMCedit and Shortcuts applications.
- Admin user permissions on your Mac - or at least the ability to run commands using "sudo" in terminal.
- Your trusty Mac.
- A little bit of confidence. Typing system-level commands into your machine shouldn't scare you.
What You'll End Up With
At the end of this exercise you'll be able to use a keyboard shortcut, ⌘-ALT-W, to turn Airport (W for Wireless) on, and ⌘-ALT-Q (for Quit) to turn it off.
Here's What You Have To Do
1. Download and install OMC on your Mac
OMC is a utility which allows you to run Unix (terminal) commands on your apple from inside a context menu. With this app, you can ⌘-click or right-click anywhere on your desktop and in various applications, and run Unix commands, start applications etc through the GUI. Here's a good tutorial. OMC comes with two applications bundled - OMCEdit and Shortcuts. OMCEdit gives you a GUI editor to create and change the script files which OMC uses to run Unix.
2. Get familiar with the networksetup command
MAC OS X has a Unix command you can run in terminal which turns your Airport device on or off. You'll need to get familiar with what it does. Here's how it works:
- Start the Terminal app on your mac
- Type in "sudo networksetup -setairportpower off" and hit return
- Enter the password when asked
- Airport on your Mac will turn off
- Type in "sudo networksetup -setairportpower on"
- Airport turns on again
3. Write an "Airport On" OMC script using OMCEdit
Using OMCEdit you're going to write a script which runs the Unix command you tried in the step above. Here's how:
- Start the OMCEdit application. If you can't find it, it's in the OMC application folder which got added when you downloaded and installed OMC (step 1 above).
- Create a new OMC command. Go to Command => New in OMCEdit. A new command window will open called "Untitled":

- The first thing I do now is change the name of the command to "Turn airport on" by typing the name into the "Command Name" box, then hit save:

- Now you need to configure the OMC command to run the networksetup command as before. I've also added a sudo -K line to clear the sudo password cache. This adds extra security. Here's the screenshot:

- You also need to configure the Activation and Execution screens as follows:


- Once you're done, save your command and quit the application.
Sudo is a great command as it lets you run system-level (root) commands without needing to log in as root. However, because you're running commands at root level, you need to type in your password for it to work. This is a problem because you can't configure OMC to type in a password when you run commands. You can get around this by configuring sudo to allow only the networksetup command to run without a password, and only for your username.
***WARNING: Before proceeding, note that incorrectly configuring sudo can remove your permissions to run any command on your Mac. Proceed with extreme caution.***
Who can run sudo and how on a Mac is controlled by a file called sudoers which can be found in the directory /private/etc/ - have a look at what it contains using the command cat /private/etc/sudoers in Terminal. You should see a section containing user priviledge specifications:
# User privilege specification
root ALL=(ALL) ALL
%admin ALL=(ALL) ALL
Here's what my file looks like:
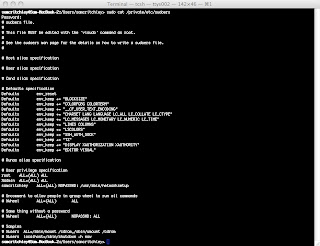
This is used to set specific priviledges for the sudo command. Here's how to edit it so you can run sudo networksetup without needing to type in the password every time:
- Work out your username. You can do this by tying the command whoami into terminal:

- Let's label your username as "yourusername" in the commands we're using.
- Now you need to go in and configure the sudo file to add an exception which allows you to run sudo networksetup for your username without needing to enter a password. You do by using the visudo tool to edit the sudoers file. Visudo uses the vi editor, which is built into Mac OS X, to edit the file. If you are not familiar with vi, I'd recommend getting a short vi tutorial and practising on another file before you go ahead and edit this important system file.
- Use the command sudo visudo to edit the sudoers file and add an exception line for the networksetup command for your username. The exception should be the following line:
- Note that there are tabs, not spaces, before the first "ALL" and the "NOPASSWD". Here's a screenshot for how it looks on my machine:

- Now save the file in vi (usually by pressing ESC and then typing :wq followed by return).
- You should now be able to run the networksetup command without needing to type a password. You can test this by clearing the sudo cache using the command sudo -K and then trying sudo networksetup -setairportpower on or sudo networksetup -setairportpower off - if you need to type a sudo password your edit hasn't worked.
- You can also test by running the OMCEdit app, selecting your command and clicking the "Run" button. You should get something popping up on screen to tell you the command has run okay.
Now you've written your OMC command and got it working without needing a sudo password it's time to assign a keyboard shortcut to the command. For this, you'll need the Shortcuts app which comes with OMC. It runs in the background and listens for shortcut keys you've configured. Set this up so that it runs in the background when your machine first starts up:
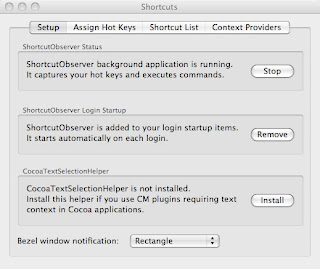 Now, assign the shortcut keys in the "Assign Hot Keys" tab. You'll need to select your script name in each of the drop-down menus:
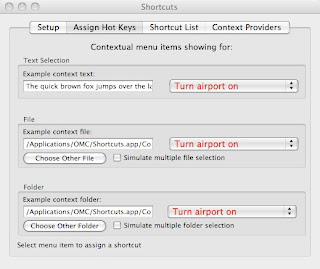 Each time you do this, a dialogue screen should come up where you can type in the shortcut key combination you want to use:
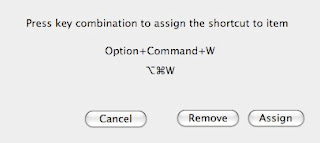 You should then check this has registered by going to the Shortcut List tab:
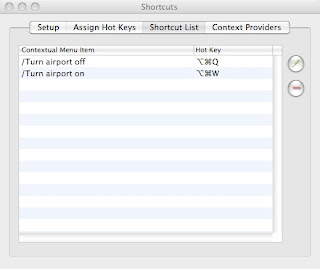
Now test your shortcut key by quitting the shortcuts application and hitting your keyboard shortcut combination to turn your Airport on.
6. Repeat for Airport Off
Now all you have to do to add an "Turn airport off" keyboard combination is add another OMC command using OMCEdit and then do the same in Shortcuts.
Enjoy!


No comments:
Post a Comment